
If you are looking for a source for bodyweight workouts for beginners, this is it!
Today I’ll dive deep into the realm of bodyweight training. I will explain the science behind bodyweight training, show you my favorite exercises, and at the end – give you a three-day split calisthenics workout routine specially tailored for beginners!
Ok, let’s get on with it!

Here’s my ultimate guide to bodyweight workouts for beginners:
Contents
- 1 The Beginners Guide to Bodyweight Training
- 2 Bodyweight Exercise vs Weight Lifting: The Super Short Version
- 3 5 Basic Bodyweight Exercises for a Total Body Workout
- 4 Greasing the Groove: The Secret to Building Strength
- 5 Putting it All Together: The Beginner Bodyweight Workout
- 6 How to Start Calisthenics: Video Beginner Guide
- 7 Final Words: Bodyweight Workouts is Beginner Friendly
- 8 Other Helpful Resources
The Beginners Guide to Bodyweight Training
Like any training method, bodyweight exercise will produce results as long as it’s done right.
The objective of working out is to improve your strength and body.
So, how can your muscular strength be improved?
Well:
This goal can be accomplished by applying external stimuli of any type to your body.
You might be chopping logs in Siberia (cue Rocky IV training montage) or doing elaborate CrossFit workouts under a personal trainer. Your muscles cannot tell the difference either way.
The fact is:
Out of all the ways that you can get a good workout, bodyweight exercises are the most accessible and versatile.
And yeah: Bodyweight exercises WILL build muscle.
All you need is a pull-up bar and a couple of towels, and you can get fit and strong literally anywhere.
But remember, do not fall for the hype.
There is nothing magical or mysterious about bodyweight training either. It is simply the most convenient way to get things done.
Okay, let’s move on:
The benefits of bodyweight training over conventional weightlifting can be summed up in several points…
5 Cool Benefits of Bodyweight Training
-> Exercise Where and When You Want
Bodyweight training can be done anywhere, at any time, with no restrictions. Your body is your gym, and gravity is your barbell.
-> The Natural Way of Exercise
Bodyweight training is functional. You are training your body to move, instead of moving weights with a perfectly made handle under very specific restrictions.
“One of the beautiful things about calisthenics is that we celebrate movements that use the whole body cohesively, rather than attempting to isolate small body parts one at a time.”
Reference: bodybuilding.com – How To Build A Calisthenics Body
-> Easy on Joints and Tendons
Bodyweight training builds excellent joint and tendon strength.
Bodybuilding forces the trainee to move in a specific way to emphasize specific muscles, which usually results in wear-and-tear to your joints.
When it comes to bodyweight training, you can only get injured if you overestimate your strength and go well beyond your limits. The risk of regular injuries is minimized –but not ruled out.
-> Efficient for Building Strength
Bodyweight training is incredibly efficient for building strength.
People who have trained in gymnastics for years will push incredible amounts of weight the first time they try to bench press or deadlift; the same cannot be said for the opposite scenario.
-> Gets Rid of The Fat
Bodyweight training will force you to lose fat.

Gymgoers who are influenced by bodybuilders will regularly undergo bulking and cutting phases, which means overeating and dieting.
While that is very effective for building muscle, it is not as efficient for the average natural trainee.
When it comes to powerlifting, a large gut can be beneficial. But when it comes to bodyweight exercise, being overweight is a massive disadvantage.
You might even subconsciously stop eating that much to make your training easier!
Bodyweight Exercise vs Weight Lifting: The Super Short Version
The main obstacle in bodyweight training is progressive overload.
When you begin exercising, you experience what is called noob gains, a respectable amount of muscle and strength in the first few months of training. But your body adapts to that.
You must keep exercising for a period that’s long enough to produce results but also introduce variety to your workouts and slowly increase the difficulty of the exercises.
When you’re lifting a dumbbell, that’s easy; you just slap another couple of plates to each end.
But when you’re doing bodyweight training, increasing the difficulty is trickier.
Doing more reps will only serve to increase your endurance after a certain point, not doing much for your strength or appearance.
You must continuously apply a greater amount of resistance than what you’re accustomed to.
Ultimately, gyms are an unnecessary expense and hassle as long as you have a plan of action.
And that’s precisely what I’m going to provide!
5 Basic Bodyweight Exercises for a Total Body Workout
Enough talking. It’s time for some exercise!
Following, you will find five basic bodyweight exercises bound to have you sweating – no matter your fitness level.
To start off with, I have added some theory behind each of the exercises and added both some beginner variations and some advanced as well.
I hope you find it helpful!
The Push Up: The Mother of Chest Exercises
The pushup is an exercise that everyone has done at some point.
It trains your chest, shoulders, triceps, and core, building up your strength and giving you a solid muscle base.
The main advantage of the pushup is that it trains your muscles to their optimal range of motion, which means that you get to avoid catastrophic shoulder injuries that usually occur with regular benching, even if you have good form –most people don’t.
It also provides some stimulation to most of your muscles through isometric contraction because you need to be locked into place, from your neck to your toes.
The form of the pushup varies according to your limb length and existing injuries, but here are a few points on how you should best perform a pushup:
- Keep your torso and hips in alignment, do not sag or stick your butt up. If you have difficulty in doing that, you need to train your core.
- Keep your hands in the most comfortable position, slightly below your shoulders and around shoulder-width apart.
- Keep your legs together.
- Maintain a steady speed, two seconds up, two seconds down.
An incredible amount of pushup variations exist; but most of them are gimmicks, smoke, and mirrors.
In this article, I’ll give you pushup variations that gradually increase in difficulty and strength requirements to follow the principle of progressive overload.
If you want to check out an entire article DEDICATED to push-ups, be sure to check out and bookmark my push up workout for beginners!
Now, let’s move on:
Push Up Beginner Variations
Knee pushups: Kneel on the floor and place your hands at shoulder width. Keep your body straight and lower yourself until your chest almost touches the ground and push yourself back to the starting position.
If you can’t perform full knee pushups due to an existing injury or lack of flexibility, go as low as you can and gradually increase the depth.
Half pushups: Or, what most people think are real pushups.
Assume the pushup position and lower yourself until your elbows are almost parallel to the floor. You can put a ball under your hips and lower yourself until you make contact with it.
After you touch the ball, push yourself back up.
Full pushups: Assume the pushup position, bend at the elbows and shoulders until your chest almost touches the ground, or put a tennis ball under your chest and count a rep every time you touch it.
Push Up Advanced Variations
Uneven pushups: Get in the pushup position. Place your one hand on a basketball directly under your shoulder. Bend until your chest touches the hand on the ball.
Lever pushups: Assume the uneven pushup position, but position the basketball to your side around shoulder height, at arm’s length. One of your arms should be extended to the side, grasping the basketball.
Slowly lower yourself until you’re almost touching the ground, then push back up. Rest, switch hands, and repeat.
If you get to the point where you can do two sets of 10, remove the basketball and repeat.
Push Up Progression
When it comes to pushups, your goal should be three sets of 10, 15, and 20.
Once you can do three sets of 20, you can move on to the harder variation.
Expert variations of the pushup, like one-arm pushups, are not recommended until you have excellent strength, core strength, and balance.
If you can do full pushups, refine your technique, and master the basics; the rest will come in time.
After you reach the 20 mark, you can increase the resistance by loading a backpack with weight, do very slow reps or aim for increasing your endurance: Hitting a set of 50 or even a 100 with perfect form are worthy goals.
For variety, do some of these bodyweight chest exercises and feel the muscles grow!
The Pull Up: The Secret Sauce to a V-Shaped Back
The most important piece of equipment you’ll ever own is a pull-up bar.
The pushup may be an essential exercise, but pull-ups are the gold standard in measuring upper-body strength.
Pull-ups are an exercise in humility (I crack myself up); the biggest guys you know might be incapable of doing more than 5, and many people that consider themselves to be athletic can’t even do one.
The pull-up trains your back, shoulders, biceps, forearms, and core.
Except for the squat, the pull-up is the most complete athletic movement, and it involves often-overlooked muscle groups – quite literally, the ones you can’t see, the muscles your back.
Most people have overdeveloped front shoulder and chest muscles and weak back muscles, which leads to posture issues, neck pain, and being prone to injuries.
The pull-up can fix all that, but progress is somewhat harder than the pushup.
Here’s what you need to do:
Pull Up Beginner Variations
Dead hangs: One of the most limiting factors when it comes to pull-ups is grip strength.
Unlike our grandparents, most of us no longer tile the earth or work in factories, and slamming a keyboard doesn’t really register as a hand workout.
Grab the bar with a wider-than-shoulder grip, keep your arms almost straight (don’t lock out your elbows), pull your shoulder blades down and back, and hold on as long as you can.
Flexed arm hang: Get on a chair and firmly grip the bar with your chin looming over it.
Try to think of your arms as hooks and do your best to feel the muscles around your armpit and back – your lats.
If you don’t, you won’t be able to hold on for long with just your biceps.
If you can hold for a couple of seconds at first, it’s a good start. Try to stay above the bar for as long as possible, but don’t go beyond your limits.
Negative pull-up: Grab the bar and do a small jump until your chin is over the bar. Then, using slow and controlled motion, slowly lower yourself until your arms are almost straight.
Aim for a 10-second negative.
Assisted pull-up: Buy a resistance band, loop it around the bar, and put one of your knees in it.
Perform a pull-up with an overhand grip, beginning the motion with your lats and pulling your elbows towards your body.
Pull Up Advanced Variations
Pull-ups: Same as the assisted one – without the resistance band.
Hang from a bar and pull yourself up until your chin clears the bar. If you’re tall or have really long arms, your eye level will do.
Supplementary Chin-ups: a chin-up is a pull-up with an underhand grip or your hands facing towards you.
Chin-ups are about 10-15% easier, depending on your arm strength. But I would advise against focusing on chin-ups because they’ll subconsciously train you to depend on your arms more than the “sleeping” muscles of your back.
You can do chin-ups as a supplement to your pull-up workouts.
Pro Tip: wrap two small towels around the bar at the points where you’ll be grabbing it.
A thicker grip makes the exercise harder but builds your grip strength.
Also, doing any pull-up variations will inevitably start tearing the skin of your hands until you grow very thick callouses. A towel can help with that by softening your grip.
Pull Up Progression
Pull-ups are significantly more taxing on your body, so the progression is a bit different.
Dead hangs are your first priority.
Once you feel like you can stay under the bar for 6-10 seconds, you can supplement that by doing flexed arm hangs and negatives.
Once you can do three sets of 5 controlled negative pull-ups, you can try doing a real pull-up.
If your grip stops being a limiting factor, you can drop dead hangs and flexed arm hangs and just do small sets of pullups and negatives.
Alternatively, you can supplement your routine with a few of these bodyweight back exercises until your underarms gain their needed strength.
When you reach the point where you can do eight pullups in one set, you can officially start considering yourself to be strong.
Need further help in reaching your first pull-up? No problem!
Check out this pull up program for beginners; it will have you doing those pull-ups in no time!
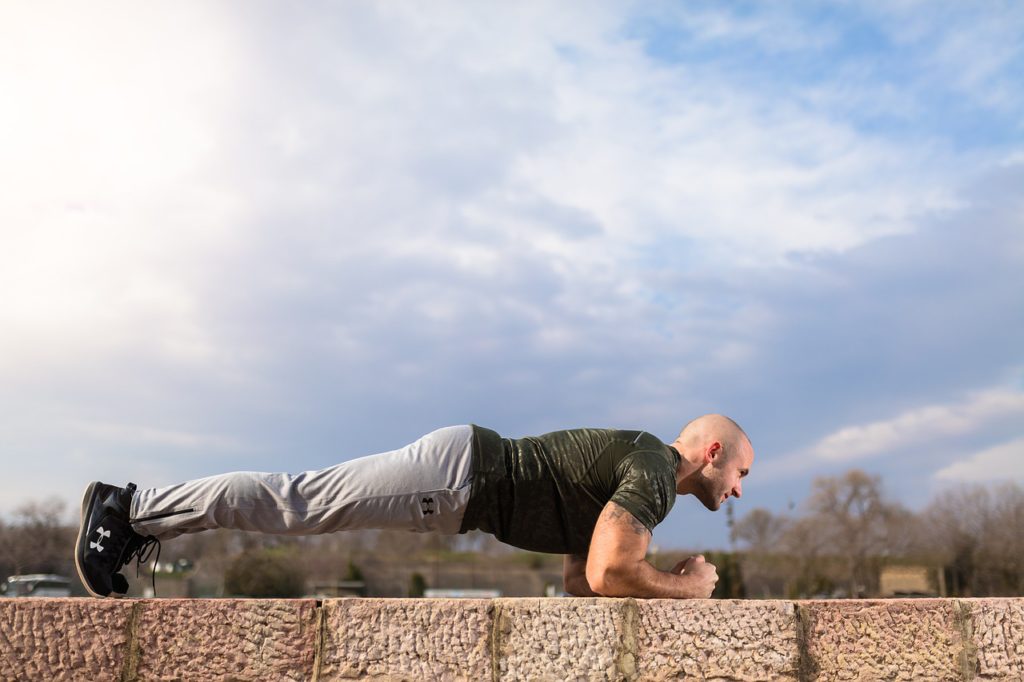
The Plank: The Shortcut to a Killer Core
The plank is an incredibly simple yet powerful exercise.
It works to develop all the muscles of your core, mainly your abs and the deep muscles beneath them.
To perform a plank, get in a pushup position and transition to holding your weight with your elbows; only your elbows and toes should be in touch with the floor.
Keep your back and legs straight, do not allow your butt to sag, and try to hold the position for as long as possible.
If it’s too difficult, drop to your knees.
When you get to the point where you can hold a plank for 2 minutes or more, buy an abdominal wheel.
It will allow you to take your core strength to the next level with simple but very challenging exercises, basically a plank on wheels.
For even more core strengthening exercises, here are the 10 best core strength exercises. Go check it out!
The Squat: The King of Massive Legs
You should take care not to neglect your legs; being covered by pants all year long is not an excuse.
The hips and the thighs are home to the strongest and largest muscle groups of your body, and leg strength is very important for your well-being and all-round usefulness.
The squat works every muscle in your hips, thighs, and calves, as well as your core to a degree. It mainly depends upon the quads, the glutes, and your flexibility.
Squatting with a barbell on your back will build incredible amounts of muscle and strength, but it is also a risky exercise without proper instruction on form.
Even if your form is nearly flawless –and it won’t be accidents tend to happen, and having 100 kilos resting on your shoulders isn’t exactly the best situation.
Bodyweight squats can be modified to progressively increase resistance in a similar way to lever pushups.
Here are a few pointers:
- Do ass-to-grass squats, no half-movements. If you don’t follow through the entire motion, your muscles will not be developed equally
- Control the negative portion of the movement, do not just rely on momentum to go up and down
- Bend forward but do not allow your knees to pass the position of your ankles by a large margin
- Do not lift your heels off the ground
Squat Beginner Variations
Supported squats: If you can’t do a proper squat without support, grasp a sturdy table at waist height and slowly lower yourself until your thighs are below parallel to the ground.
Full squats: Stand with your feet apart at shoulder width and your arms on your shoulders or straight out, whichever is more comfortable.
Bend at the hips and knees, don’t let your lower back sag. Descend until your thighs touch your calves or to the limit of your ankle flexibility.
Do not allow your heels to leave the ground, and push yourself off the ground using your leg strength.
Close squats: Same as above, but with your heels together and your toes pointing outwards.
Squat Advanced Variations
Uneven squats: Assume the full squat position and rest one of your ankles on a basketball about one foot’s length in front of your ground-touching foot.
Extend your arms in front of you for added stability and descend until your thighs break parallel. Push yourself back up.
Do not rock forward, do not bounce, and do not allow your heels to leave the ground; you may injure yourself.
Half pistol squat: Assume the uneven squat position with one leg nearly straight and extended in front of you.
Descend until your thighs are at least close to parallel to the floor. Begin with a shorter range of motion and slowly increase it over time.
When you can squat low enough so that the back of your leg touches your calf, you’ve achieved the true one leg squat.
Squat Progression
Squats are the easiest exercise out of the 4.
Aim for three sets of 20 to progress to the next variation. Training your leg endurance is essential, so achieve three sets of 50 full squats or close squats before moving on to the more advanced variations.
If you can do half pistol squats, you’ll definitely notice the immense difference in your leg muscularity.
Greasing the Groove: The Secret to Building Strength
Pavel Tsatsouline, author of the famous book “The Naked Warrior” and former Spetsnaz instructor, decided to treat strength training as you would a skill: -Do it frequently until you get good at it…
Pick one or two exercises at most, say, pull-ups and pushups, and do them frequently.
Install a pull-up bar under your bedroom or bathroom door. Every time you pass under it, you must do a pull-up: low reps, high frequency.
“Grease the Groove, improves neuromuscular efficiency, and requires neither sweat nor pain. What Grease the Groove does demand is perfect practice, and a lot of it.”
Reference: mensfitness.com – The Training Method You Never Tried Before: Grease The Groove
You need to possess a certain level of strength before beginning this, never pushing yourself close to muscle failure.
If you can do three pull-ups, only do one every time you pass under the bar. If you can only do five pushups, do two and so on.
Greasing the Groove is supposed to supplement your regular workouts, so don’t push it too much and don’t enforce it after a hard workout.
Employ a very strict form, stop if you feel fatigued, and know your limits.
If you don’t have the strength to do a few pull-ups yet, do a couple of slow negatives every time you pass the bar.
Greasing the Groove works with your strength, not your muscularity. It is a neurological adaptation:
Strength mostly comes from your Central Nervous System but is, of course, limited by your muscles.
If you do it right, you’ll notice strength gains within 2 or 3 weeks.
Putting it All Together: The Beginner Bodyweight Workout
Now that we have explained the four exercises, we can proceed toward creating a minimalistic but effective workout regime.
Remember, consistency is vital.
Do not fabricate excuses for skipping out on workouts. It is a slippery slope, and you’ll fall off track sooner than you expect!
Anyway, here’s the workout:
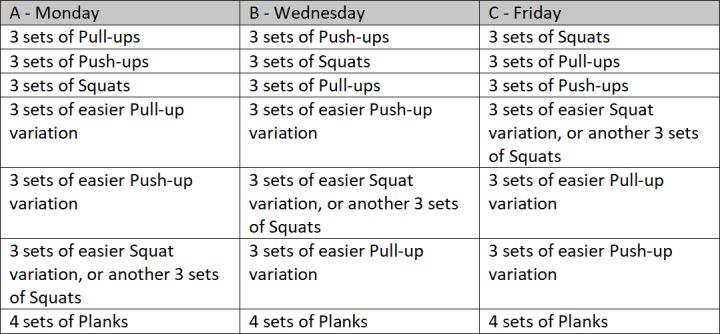
One day on, one day off – with Sunday as a rest day.
This program assumes that you’ll be greasing the groove with Pull-ups and at least one more exercise.
Feel free to do Planks whenever you feel like it because your abs can handle a great amount of volume.
If you feel that the volume is too much for you to handle, or if you can’t do proper pull-ups yet, feel free to do three sets of Dead Hangs and Negative Pull-ups instead, as they are far less taxing on your body than regular ones.
When it comes to your set, try to keep one rep in the tank. It is far better for your joints than working out to failure!
Listen to your body, do not be afraid to experiment and use this as a template if you think more or less volume is suited to your current needs.
Don’t forget to warm up your joints before training -and stay focused!
Do not disrespect the Rest Days –even god needed one- and try to follow the template of AxBxCxx, x standing for a rest day.
Always keep in mind that less is more. So, give it a go.
How to Start Calisthenics: Video Beginner Guide
Final Words: Bodyweight Workouts is Beginner Friendly
Whether you are a beginner or an exercise veteran, – calisthenics will be a great supplement to your workout routine.
When using your body the way it is supposed to, you will build functional strength, which can actually be used in your day to day life.
Functional training will provide you with:
- balance,
- coordination,
- and you will strengthen all the supporting muscles that people usually neglect when doing their gym routine.
As a result, your body will be more healthy, stronger – and you will look like a million bucks!
Now, did you find my guide on bodyweight workouts for beginners helpful?
Do you have a favorite exercise you would like to share?
Send me an email, and I might include it in my next article!
Other Helpful Resources
- Calisthenics Body vs Gym Body: How Do They Differ?
- Does Calisthenics Build Muscle? The Beginners ABC to Calisthenics Exercise
- The Popular Curvy Body Workout at Home Routine Revealed!
- What is the Best Dip Station for Calisthenics: Reviews and Top Picks
- The Ultimate At Home Strength Building Article Collection
1 thought on “Bodyweight Workouts For Beginners: The Ultimate Calisthenics Guide”
Comments are closed.